As the seasons change and winter approaches, it’s time to start thinking about protecting your RV from the harsh cold temperatures. One essential step in winterizing your recreational vehicle is ensuring that your water lines don’t freeze. And that’s where RV antifreeze comes into play.
RV antifreeze is a specially formulated liquid designed to prevent freezing and potential damage to your plumbing system when temperatures drop below zero. It’s an absolute lifesaver for all RV fans who want their vehicles to stay in tip-top shape during those chilly months.
In this blog post, we’ll guide you through the process of how to put antifreeze in RV lines , so you can confidently face whatever Mother Nature throws at you this winter season! So let’s dive right in and learn everything there is to know about safeguarding your beloved home on wheels.
Understanding to put antifreeze in rV lines:
When it comes to preparing your RV for winter, one important step is properly winterizing the water system. This includes understanding how to put antifreeze in the RV lines. By doing so, you can protect your plumbing from freezing temperatures and potential damage.
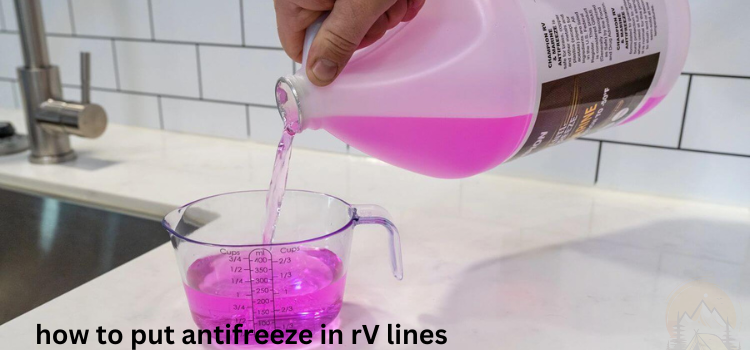
Make sure you have the right type of antifreeze specifically designed for RVs. Regular automotive antifreeze is not suitable as it can be toxic when consumed and may cause damage to your plumbing system.
To begin the process, locate the water pump in your RV and find the intake hose. Using a funnel, pour enough antifreeze into a container that can be connected to this hose. Turn on each tap inside your RV one at a time until you see pink-colored liquid coming out. This ensures that all lines are filled with antifreeze.
Don’t forget about other components such as toilets, showers, and outdoor faucets! Each of these should also be flushed with antifreeze to prevent any residual water from freezing.
By following these steps, you can ensure that your RV’s plumbing stays protected during those cold winter months! Stay safe and happy travels.
Different types and their uses to put Antifreeze in RV lines:
When it comes to choosing the right antifreeze for your RV, there are a few options available. Each type has its own unique properties and uses. Let’s take a closer look at some of the different types:
Ethanol-Based Antifreeze:
This type of antifreeze is commonly used in RVs as it provides protection against freezing temperatures while also preventing corrosion in the plumbing system.
Propylene Glycol-Based Antifreeze:
This non-toxic option is ideal for those who prefer an environmentally friendly solution. It offers excellent freeze protection and Oiling properties.
Silicone-Based Antifreeze:
If you’re looking for long-lasting protection, silicone-based antifreeze is worth considering. It has a higher boiling point than other types and can withstand extreme temperatures.
Hybrid Antifreeze:
As the name suggests, this type combines different chemicals to provide enhanced performance and protection against freezing, rust, and scale buildup.
By understanding how to put antifreeze in RV lines and knowing which type to choose, you can ensure that your plumbing system remains protected during winter storage or when traveling through cold climates.
Why is it important to put antifreeze in RV lines?
Ensuring that antifreeze is properly put in RV lines is important for the overall maintenance and longevity of your recreational vehicle. Failure to do so can lead to costly repairs and potential damage caused by freezing temperatures.
By putting antifreeze in the RV lines, you are effectively protecting your plumbing system from freezing and bursting during winter storage or when camping in cold climates. This preventive measure helps safeguard against expensive repairs that may arise from frozen pipes, fittings, or valves.
Not only does antifreeze protect the internal components of your RV’s plumbing system, but it also provides peace of mind knowing that you have taken necessary precautions to keep everything running smoothly. It ensures that when spring arrives or whenever you decide to use your RV again, you won’t be faced with unexpected issues due to water damage caused by frozen pipes.
Taking the time to put antifreeze in your RV lines is a simple yet essential step in maintaining the integrity of your plumbing system. By doing so, you can enjoy worry-free travels and avoid unnecessary expenses associated with freeze-related damages. So don’t forget this important task before storing or preparing for colder weather.
Step-by-step guide on how to put antifreeze in rV lines:
By following these steps diligently, you can effectively put antifreeze in your RV lines and safeguard against freezing temperatures throughout winter. Remember, always refer to manufacturer guidelines for specific instructions related to your particular model.
Prepare your RV
Before you begin the process of putting antifreeze in your RV lines, it’s important to make sure your vehicle is ready. Start by draining all the water from your fresh water tank and hot water heater. This will ensure that there is no residual water left in the system.
Locate the bypass valve
Next, locate the bypass valve on your RV’s water pump or backflow preventer. This valve allows you to divert the flow of water away from certain parts of the plumbing system and directly into the antifreeze line.
Connect a hose to the antifreeze intake
Attach a short length of hose to the antifreeze intake on your RV’s water pump or backflow preventer. Make sure it is securely fastened to avoid any leaks during this process.
Add antifreeze
Now it’s time to add antifreeze into your RV lines. Pour enough antifreeze into a clean bucket or container that can easily be transported around your vehicle. Slowly pour this mixture into the hose connected to the intake until you see pink liquid flowing through each faucet and toilet.
Flush out remaining water
To ensure all areas are protected, go through each faucet (both hot and cold), showerhead, toilet, and any other locations where there may be standing water. Run them until you see pink fluid coming out consistently without any traces of clear liquid.
Tips and precautions for putting antifreeze in RV lines:
By following these tips and taking necessary precautions, you’ll be able to effectively winterize your RV with confidence.
Prepare your RV:
Before starting the process, make sure to drain all water from your RV’s plumbing system. This includes emptying the tanks and clearing out any remaining water in the pipes.
Choose the right antifreeze:
It’s crucial to use RV-specific antifreeze that is non-toxic and safe for drinking water systems. Avoid using automotive antifreeze, as it can be harmful if ingested.
Locate access points:
Find the appropriate access points to pour antifreeze into your RV’s plumbing system. These are typically located near the fresh water tank or city water connection.
Use a hand pump or gravity feed method:
To add antifreeze to your plumbing lines, you can either use a hand pump or rely on gravity feed by elevating an open container of antifreeze above each tap.
Start with low-end fixtures first:
Begin pouring antifreeze into the lowest point in your RV’s plumbing system, such as faucets or shower heads located closer to the ground. Work your way up towards higher fixtures like sinks and toilets.
Don’t forget exterior connections:
Remember to flush out any exterior connections like outdoor showers or sprayers by connecting them to a jug of antifreeze.
Alternative methods for winterizing your RV:
Winterizing your RV is an important step to ensure its protection during the cold months. While using antifreeze in the lines is the most common method, there are alternative approaches you can consider.
One option is blowing out the waterlines with compressed air. This involves connecting an air compressor to your RV’s water system and using regulated pressure to remove any remaining water from the pipes. It’s important to follow manufacturer guidelines and use caution when using this method.
Another alternative is using a bypass kit for your hot water heater. By installing this kit, you can prevent antifreeze from entering the hot water tank, saving on costs and reducing waste.
Some RV owners also choose to drain all of their tanks completely before winterizing instead of relying solely on antifreeze. This ensures that no residual moisture remains in the system.
By exploring these alternatives alongside traditional methods like using antifreeze in RV lines, you can find the best winterization solution for your specific needs
Common mistakes when putting antifreeze in RV lines and how to avoid them:
To ensure a smooth and hassle-free winterization process for your RV, it’s important to be aware of the common mistakes that can occur when putting antifreeze in RV lines.
One common mistake is not properly draining all the water from the plumbing system before adding antifreeze. This can dilute the antifreeze and reduce its effectiveness in protecting your RV during freezing temperatures. To avoid this, make sure to thoroughly drain all water tanks, pipes, and tap.
Another mistake is using too much or too little antifreeze. Using too much can lead to wastage and unnecessary expenses while using too little may not provide adequate protection against freezing temperatures. Follow manufacturer instructions carefully to determine the correct amount of antifreeze needed for your specific RV model.
Conclusion:
Properly winterizing your RV’s water system by adding antifreeze to the lines is an important step in protecting your vehicle during colder temperatures. By following mentioned above all related to how to put antifreeze in rV lines tips and steps, you can ensure that your RV will be ready for use when warmer weather returns. Taking the time to properly maintain your vehicle will save you time and money in the long run and allow you to enjoy many adventures on the road. Stay safe and happy travels.
FAQS:
Do you leave RV antifreeze in lines?
Antifreeze will be in your P-traps, in your holding tanks, and throughout your plumbing lines after you’ve winterized your RV. You must drain out any remaining antifreeze from your RV’s water system before using it for drinking, dishwashing, or showering.
How long does RV antifreeze last in a camper?
Now, you usually do need to check your antifreeze levels after using RV antifreeze to make sure they don’t become too low. Simply top it off with new antifreeze if they do. Generally speaking, though, this technique ought to last a few years because the antifreeze doesn’t evaporate easily.
Is pink RV antifreeze non toxic?
RV antifreeze is harmless, nontoxic, and non-hazardous, at least not when used as directed by humans, but you definitely don’t want to drink it (larger amounts are bad for you, and it tastes terrible).